Close View Secondary Adjustment
Many people have found adjusting the alignment secondary one of the most difficult steps in collimation. This is partly because the iterative nature of the tilt/rotation adjustment, but also because when using a laser to adjust the tilt of the secondary mirror, it is hard to see exactly where the laser beam is hitting the primary mirror as it is often a long way away from the secondary adjustment screws. I have often needed to peek inside the bottom of the shroud on my Obsession 20 f5 and perhaps even shine a red flashlight on the center spot at night to find out exactly where the laser beam was hitting the primary mirror.
This is exactly the same problem, but at the other end of the scope, that I encountered when I first tried Nils Olof Carlin's Barlowed Laser method back in 2004. Adjusting a knob at one end of the scope while observing the effects on a target at the other end was inconvenient. I tried combining a rearview laser with a Barlow. This allowed the accuracy of Barlowed laser collimation with the convenience of seeing the effects while at the primary end of the scope. I posted the results on the skyquest telescopes group and put the results on my website:
http://www.smartavtweaks.com/RVBL.html

Having done all my recent collimations with a Glatter Laser and TuBlug the best current implementation of the above idea, I decided to check everything with a Cheshire and not surprisingly I had a bit of tilt/rotation error. Lasers can't do it all! So I went through all the iterations using the Cheshire, the Glatter holographic accessory and the 1mm aperture stop for the Glatter laser that has a nice white target as part of the accessory. In the process I think I found an easy way to monitor secondary alignment from the front of the scope in a way that is easy to see small errors and works well in the dark. Note this method was first described by Vic Menard on the Cloudynights website where he described it as collimation with his reading glasses.
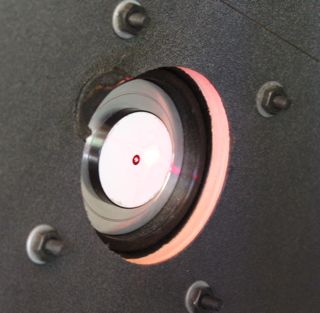
The photo to the right shows the white target that is part of the 1mm Glatter laser accessory. As this target is located at the focuser it would be an ideal place to observe the effects of secondary mirror tilt adjustments as opposed to where beam lands on the primary, as it is much closer to the adjustment knobs and it would be easier to see small allignment errors.
 As has often been noted, the diffraction rings produced by the Glatter laser with the 1mm aperture stop will typically cause enough laser light to fall on the primary center spot that its shadow can be seen on the white face of the laser 1mm target, and thus achieve the same advantages as using a Barlow for primary collimation. In the picture on the right, one can see the center spot shadow off to the right of the center of the target. One can also see the returned laser beam and the diffraction pattern on the target centered a bit above the center spot shadow.
Close View Secondary Adjustment
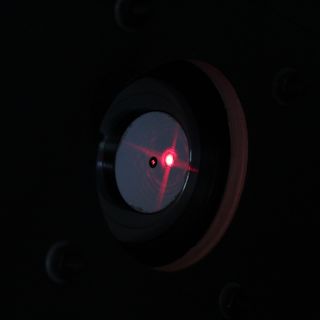
 If the primary mirror is collimated well enough for the center shadow to fall on the target, one can use the shadow of the center spot on the white target, as a “target” for centering the return laser beam/diffraction pattern. When the two are aligned it would seem to me to be good indication that the laser beam is indeed hitting the center of the primary mirror, whether the shadow of the primary center spot is centered on the white laser target or not. The key is to understand that the “target” for the returned laser beam is not the center of the white target, but the center of the center spot shadow that represents the center of the primary mirror.
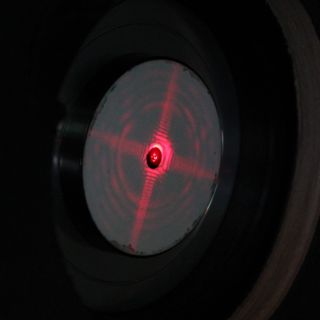
In my case, my mirror has a crosshatch or + sign etched in the center of the mirror by the vendor. When the 1 mm laser beam hits the crosshatch, the beam tends to scatter. What I was surprised to see was that I could then see this scatter as distinct bright perpendicular lines on the laser target when the laser beam hit the center of the crosshatch, giving an even clearer and more accurate indication that the laser beam was indeed hitting the center of the mirror (or at least what the vendor marked as the center).
This would seem to be a convenient way to watching the effects of adjusting the secondary adjustment screws on a target not only visible from the front of the scope, but close enough to see small errors accurately, even at night. This should work with or without a crosshatch in the center of the mirror.
 One can obviously then use the aperture-stopped laser as a one-device primary/secondary collimation tool and adjust the primary collimation by centering the center spot shadow on the white target. Almost there in the picture on the right.
The effects of secondary and primary adjustments on shadow and laser return beam were orthogonal and it seems that one can do the adjustments in either order. Adjusting the primary collimation knobs moved the whole pattern as expected.
Using the white target for primary adjustment does mean one needs to adjust at one of te scope while trying to see a target on the other end, which is not very convenient. I may eventually memorize which primary collimation knob moves the shadow which way on the white target, but for now, I’ll stick with the TuBlug for that step.
Visit my Astronomy page for other articles.

